Changing brake pads
Moderators: slparry, Gromit, Paul
-
rocksteady
- Posts: 31
- Joined: Wed Aug 09, 2006 3:24 pm
- Location: Basingstoke
Changing brake pads
I'll be replacing the rear brake pads soon. My Hayes manual doesn't show the type of brake caliper i have. It's the same i have seen on several other R1100's. Any advice on how to take out the old pads and replace them? 
Throwing acid is wrong, in some peoples eyes.
-
Paul
- Wanna buy a sticker mister?
- Posts: 2906
- Joined: Mon Feb 16, 2004 8:44 pm
- Location: Boxertrix Towers, Norfolk
- Contact:
this is what you do:
1) remove the caliper by undoing the two retaining bolts
2) ensure that the old brake pads are pushed back into the caliper as far as they will go
3) remove the spring clip (5), split pin (1) and drift out the retaining pin (2) as shown inthe diagram below
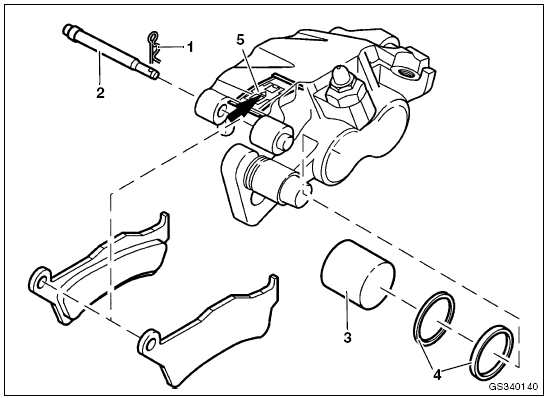
4) drop out old pads, clean off excessive brake dust and crud from caliper
5) pop in new pads
6) reassembly is reverse of disassembly ((c) Haynes 1957-2007)
6.5) tightening torque for the brake caliper bolts is 40Nm. don't exceed this because the mount on the rear wheel drive is made from that special BMW alloy of aluminium and low fat soft cheese.
7) don't forget to pump the rear brake until it bites on the disc again before riding off.
There you go. Robert is your mother's brother!
Paul
1) remove the caliper by undoing the two retaining bolts
2) ensure that the old brake pads are pushed back into the caliper as far as they will go
3) remove the spring clip (5), split pin (1) and drift out the retaining pin (2) as shown inthe diagram below
4) drop out old pads, clean off excessive brake dust and crud from caliper
5) pop in new pads
6) reassembly is reverse of disassembly ((c) Haynes 1957-2007)
6.5) tightening torque for the brake caliper bolts is 40Nm. don't exceed this because the mount on the rear wheel drive is made from that special BMW alloy of aluminium and low fat soft cheese.
7) don't forget to pump the rear brake until it bites on the disc again before riding off.
There you go. Robert is your mother's brother!
Paul
You really need only two tools: WD-40 and duct tape. If it doesn't move and it should, use WD-40. If it moves and shouldn't, use the tape.


Ahh you beat mePaul wrote:this is what you do:
1) remove the caliper by undoing the two retaining bolts
2) ensure that the old brake pads are pushed back into the caliper as far as they will go
3) remove the spring clip (5), split pin (1) and drift out the retaining pin (2) as shown inthe diagram below
4) drop out old pads, clean off excessive brake dust and crud from caliper
5) pop in new pads
6) reassembly is reverse of disassembly ((c) Haynes 1957-2007)
6.5) tightening torque for the brake caliper bolts is 40Nm. don't exceed this because the mount on the rear wheel drive is made from that special BMW alloy of aluminium and low fat soft cheese.
7) don't forget to pump the rear brake until it bites on the disc again before riding off.
There you go. Robert is your mother's brother!
Paul
---------------------------

Also, remember to smear some copperslip on the rear of the pads to stop them squeeling. I always very carefully put some on the side edges too, this enables easy removal next time around.
Steve
Steve
Well-weathered leather
Hot metal and oil
The scented country air
Sunlight on chrome
The blur of the landscape
Every nerve aware
Hot metal and oil
The scented country air
Sunlight on chrome
The blur of the landscape
Every nerve aware

-
rocksteady
- Posts: 31
- Joined: Wed Aug 09, 2006 3:24 pm
- Location: Basingstoke
Thanks very much for all the info guys, that's brilliant. I thought I was more or less on track, but being brakes I wanted to double check things before I started wielding the spanners. I have a tub of of high melting point copper grease so i'll smear the back of the pads with that.
Thanks again for the help
Thanks again for the help
Throwing acid is wrong, in some peoples eyes.
Guys,
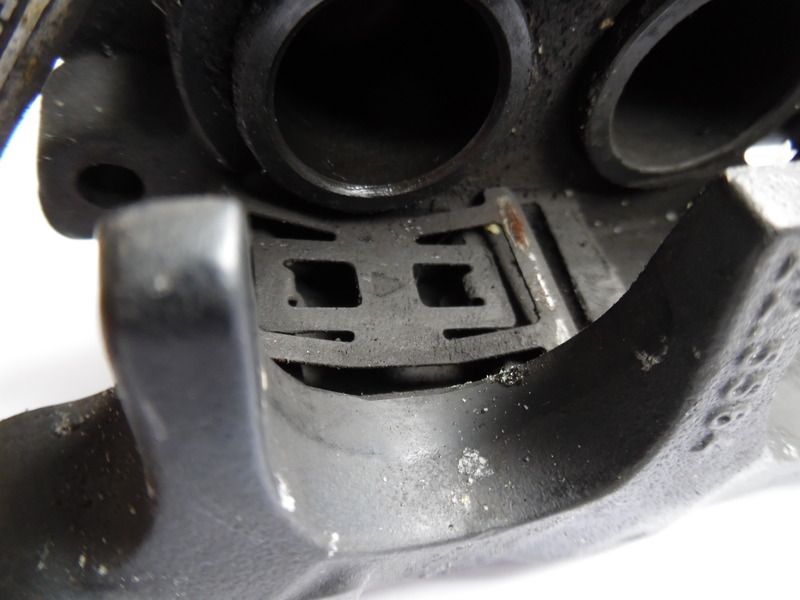
Can anyone just verify the location of the clip/spring which appears to be item 5 from the schematics... have i got it correct as per image as it just doesn't seem right (i.e. it seems very loose & doesn't appear to do much if anything at all). See image on the URL below.
Brad
https://photos.google.com/share/AF1QipP ... 90ZTdYdTNB

Bradbfisher wrote:Guys,
Can anyone just verify the location of the clip/spring which appears to be item 5 from the schematics... have i got it correct as per image as it just doesn't seem right (i.e. it seems very loose & doesn't appear to do much if anything at all). See image on the URL below.
Seems ok to me , it just clips on to the caliper.
_________________
Nigel
Keep smiling, it makes people wonder what you've been up to!
1999 R1100s (mandarin) '
2018 DL 250V Strom
2019 CB125F Honda.
MZ301 Saxon Fun ( currently retired)
'03 Bullet 65 project..
Nigel
Keep smiling, it makes people wonder what you've been up to!
1999 R1100s (mandarin) '
2018 DL 250V Strom
2019 CB125F Honda.
MZ301 Saxon Fun ( currently retired)
'03 Bullet 65 project..
-
RiceBurner

- The Mirthman Prophecy
- Posts: 1168
- Joined: Wed Feb 18, 2004 10:30 am
- Location: Hiding in your blind spot....
- Contact:
Please don't do the bit in bold.Paul wrote:this is what you do:
1) remove the caliper by undoing the two retaining bolts
2) ensure that the old brake pads are pushed back into the caliper as far as they will go
3) remove the spring clip (5), split pin (1) and drift out the retaining pin (2) as shown inthe diagram below
4) drop out old pads, clean off excessive brake dust and crud from caliper
5) pop in new pads
6) reassembly is reverse of disassembly ((c) Haynes 1957-2007)
6.5) tightening torque for the brake caliper bolts is 40Nm. don't exceed this because the mount on the rear wheel drive is made from that special BMW alloy of aluminium and low fat soft cheese.
7) don't forget to pump the rear brake until it bites on the disc again before riding off.
There you go. Robert is your mother's brother!
Paul
Drop out the pads, THEN clean the pistons up as best you can, THEN push them OUT a bit more, clean again, THEN push them back into the caliper body.
If you push them back into the caliper body before cleaning the piston walls then you'll be pushing crud up against the seals.
non quod, sed quomodo
Thanks all for the replies.. the clip/spring fell out the other day after i rebuilt the calipers some time back (i won't say when as its embarrassingly a long time ago & this would thus highlight how long its taking to get bike back on road (if only it wasn't for the wife & the kids & that thing called work).. Getting close now though.
B
B